1. Sensors are modules that can be ised for a range of operations like finding location, distance, temperature, light intensity etc. Modern day sensors form a part of everyday life. Some of the sensors we use unknowingly in our day to day life are a part of the smartphones. Modern day smartphonesare sophisticated little machines that have gone through an incredible evolution over the last decade. They are now capable of working as a personal assistant that can monitor our heartbeat, track our movements, and anticipate our needs. Some of the sensors in a modern day smartphone are:-
5. The code was once again developed and tested using TINKERCAD. Once, satisfied that the code works as desired, it was uploaded onto an Arduino UNO and the results were captured.
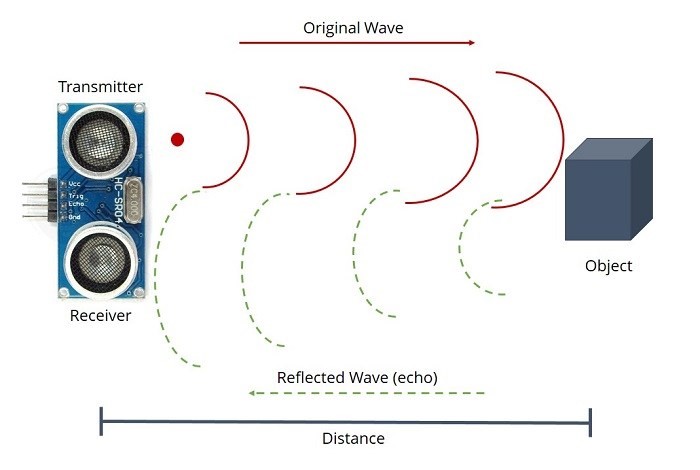
Working of HC-SR04 Module
6. HC-SR04 is an Ultrasonic Ranging Module. As per datasheet its working voltage is 5V and 15mA current. Its range is between 2cm and 400cm (with Range Accuracy of 3mm). The module works of giving a high ping for atleast 10microseconds and measuring the time duration for receiving the echo signal. The distance from any object in its measuring angle of 15degrees is measured by the formulae:-
7. This can also be calculated using the time taken by Sound to travel and then dividing the total time taken between trigger and echo. Here we first measure the total distance travelled by sound, then divide it by 2 to get the range.
8. The methodology adopted for the project was to measure the distance of an obstruction from the HC-SR04 module and using the distance light up different LEDs, this methodology can be used in real world applications for brightening the path during movement of personnel, which can selectively go dark as people move away from the path. This will allow effective power saving by selctive use of lighting.
Animated Simulation
9. The entire project was run on TINKERCAD as an animated simulation has been captured and is as shown below:-
Actual Project
10. Once satisfied that the code is functioning as required, it was uploaded onto an ARDUINO UNO and using the same layout an actual setup was developed. The code was uploaded and the running of the program was recorded. A video of the functioning of the project is attached.
Project with LCD Display
11. The code was further developed to include an LCD Display using the LCDDisplay.h Library function available online. In this the code was slightly modified to display the distance measured on 16x2 LCD screen in addition to lighting the LEDs. However, due to paucity of time the same has not yet been tried using an Arduino UNO.
12. For the purpose of the exercise a code was written to trigger the operation of a 12V DC vaccum pump using an US Sensor with a display on an LCD screen. The video of the operation of the assembly is attached below.